“3P” is not a Toyota term. The workshop structure was taught by Shingijutsu and is now being propagated by people who learned it while working in their client companies.
The most visible characteristic of 3P, the Production Preparation Process, is the idea of creating quick and dirty mock-ups of the product and the process. These mockups are often constructed of wood, cardboard, PVC pipe – materials at hand.
The idea is to be able to quickly and cheaply try out, and experience, a process (or product) so that problems can be surfaced, opportunities for improvement can be seen, and the PDCA cycle can be turned far more rapidly than would otherwise be possible.
The purpose of the mockup is to create a gemba of sorts, where you would not otherwise have one. Now, rather than doing an abstract analysis, you have something that people can see, touch, and interact with. Doing so forces details to the surface that are simply invisible in abstract models in computers or on paper.
Some companies use the process to design their products as well as the processes that are used to manufacture them.
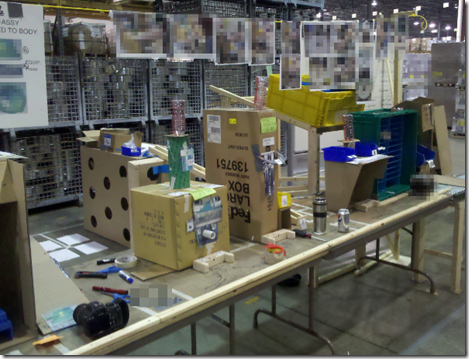
Last week one of my clients took their first steps into this process. The photo above has been pixelated so as not to reveal details about their product design.
They had done pretty extensive analysis using traditional industrial engineering methods, and had a CAD drawing of the proposed layout. That was the starting point.
The first step, then was to create that layout in real-size. That took the team about 90 minutes.
They assembled some tables, got some boxes and cardboard, and represented the machines, the work positions, the material and people flow.
Even as they were doing this, some of the team members saw things that they questioned, such as an ergonomically awkward operation. Others simply had questions. Why? Because in translating the drawing into the real world, even a superficial one, details already had to be resolved.
Once they had the starting condition mocked up, the team took prototype parts of the product and went through the motions of a team member trying to assemble it.
This felt a little awkward at first, but they began to see more opportunities, and resolve more detail.
We did a little coaching, pointing out motions that could be eliminated, others that could be consolidated. We talked about the smooth flow of people’s work, and looked for opportunities to better match the work flows to the takt time.
In the next couple of hours the team went through dozens of small PDCA cycles, each time adding a little more detail, adding a physical control, or a visual control. They found “knacks” that enabled quicker assembly with less adjustment.
They identified exactly how and where parts should be presented to the assembler.
They discovered small design and packaging changes that could make a big difference in the assembly time and quality. It did not hurt that the design engineer was trying to work out the details of one of the more awkward elements of the assembly.
They found key points that were critical to quality, examined the vulnerability to simple mistakes, and worked on how to make those more clear.
They identified characteristics that would help the machines better support the work flow. How do parts move in, move out? Where do the hands go to start the machine? How does the location of the controls support (or hinder) the work steps that come before and after?
As they looked at test operations, they started working out what they wanted to happen when there was a problem. They started to work out a line stop protocol and added andons to those machines, so they could signal an abnormal result.
Curious visitors, some senior managers, others just happening by and wondering what was going on, were enlisted as test subjects. Is the work cycle simple and clear? Is it easy to teach? Is the layout intuitive?
What can we do to make the visuals more clear, and to lay things out to guide the correct process sequence? Which “knacks” have to be taught? How quickly can a “new operator” be brought up to speed and make the takt time?
Over three days, the details came into sharper and sharper focus.
In the end, the team had constructed a full size model of their target condition. They are clear how the process needs to operate to give them the performance they want; and they are equally clear about the next problems that must be solved to get there.
They can specify their equipment with far more insight, and many of the details of how to guide the product and people through the process are now much better understood.
And, as a side benefit, this cross functional team has communicated far more than they would have otherwise with meetings and email. They have spent three days embedded in a joint project to envision what they want this to look like.
To be clear, a lot of work remains, and many more details remain to be worked out. But over three days this team now has a much more clearly aligned concept of what they are striving to achieve.


As part of this team I was impressed at the many ideas and suggestions that this 3P process surfaced. It forces you to look at every process and motion in great detail.
It also had great ergonomic benefits.
this is superb. It reminds me of how we did kaizens at a prior company. We used cardboard, tape, clamps, hands, whatever we needed to do to simulate the process change as rapidly as possible so that we could get tons of fast experiments done. I never thought about taking it to the level that you discuss. I actually have a new job coming in and we are in the process of thinking about the cell/process. this may be a perfect time to try this. thanks so much for sharing.
I think the biggest benefit of 3P is the creation of a fairly close to functional work area in true 3D. One can say whatever one wants about computer simulations, but they never quite duplicate the effect of actually being someplace and physically doing something. I’ve seen many “final” designs in a CAD system tossed out the window after a good 3P event showed the real weaknesses.
Going one step further though, I’d propose that one of the toughest things in a 3P event doesn’t happen in the event at all. It happens after the event. That’s where one needs to take the cardboard and duct tape models and turn them into reality. As good as the 3P process is, it doesn’t work all the bugs out of the proposed process. This is where you need team members available to be “keepers of the flame.” If no team members are present, one runs the risk of a cool 3P design morphing back into the original design.