How Do You Know They Know?

TWI Job Instruction is built around a four step process titled “How to Instruct.”

image

Steps 2 and 3 are the core of the process.

  • Present the Operation
  • Try Out Performance

I want to discuss Step 3: Try Out Performance

Teaching Back as Learning

All too often I see “training” that looks like this:

  • Bring the team members into a room.
  • Read through the new procedure – or maybe even show some PowerPoints of the procedure.
  • Have them sign something that says they acknowledge they have been “trained.”

This places the burden of understanding upon the listener.

The TWI model reverses this paradigm with the mantra at the bottom of the pocket card which, though they vary from version to version, is some form of: If the student hasn’t learned, the teacher hasn’t taught.

Having the learner teach back to the instructor does two things:

  1. The learner has to understand it better to be able to explain it.
  2. It provides a verification check that the instruction has been effective.

Point two is important here. Instruction is a hypothesis: “If I teach these steps, in this way, my learner will be able to perform the process.”

Having them teach back is the testable outcome of this hypothesis. If the the learner struggles, then the instructor must re-instruct. But not simply by rewinding the script and playing it again… we know that didn’t work. Instead the instructor now has to get curious about which points are confusing the learner and why, and correct his instruction.

But that’s not what I came here to discuss. TWI is just a lead-in.

Learning to See – by Practicing

An operations manager who is learning fast was challenging my insistence on having a visual status board that showed the real-time location of product on the line.

In the same breath, he was saying that he wanted the leads and the supervisor to be able to “walk the trapline” and do better seeing issues coming before a train wreck. (Empty positions, overproduction, etc.)

My response was “Having them update the magnets on that board every time something moves forces them to practice seeing what is where.”

In other words, by making them teach you where things are, and demonstrate their knowledge, they have to learn how to see that bigger picture.

“That’s the best explanation I have ever heard.”

The operations manager can walk the line and see the status himself. He doesn’t need the board. In fact, he could see even better if he went up the mezzanine overlooking the line. It’s all there.

But the board isn’t for his benefit. It is a learning tool. It is structure for the leads and supervisors to have a joint conversation, facing the board instead of each other, and reach agreement about what is where.

It gives them a clear indication if they need to escalate a problem, and a way to be able to converse about when and how they might recover (or not).

In other words, it is “Grasp the Current Condition” continuously, in real time. This lets them compare the current condition with the target condition – the standard depicted on the board.

By seeing gaps quickly, they have a better chance at seeing what obstacle or problem prevented them from operating to the target.

That, in turn, gives the manager an opportunity – in invitation – to shape the conversation into one about improvement.

Back to Job Instruction

This is exactly the same process structure as having the learner demonstrate performance. It is a check, right after the operation (present the operation) was performed to see how well it worked.

Fine Grained Observation

All of this is about moving observations, evaluations, checks, verifications away from batching them at the end of a huge block of work and embedding them into one-by-one flow. It builds Ohno’s “chalk circle” into the work itself.

The Personal Challenge of One-by-One

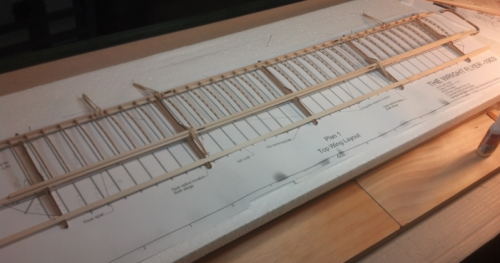
I got a cool model kit of the 1903 Wright Flyer for Christmas, and am in the process of assembling it. Each wing (top and bottom) has two spars connected by 38 ribs. (To give you a sense of the size, the wingspan of the model is just over 30 inches).

FlyerModelWing

Each of the 38(x2) ribs requires the following steps:

  1. Cut the laser cut part from the sheet.
  2. Sand the ends smooth with an emery board. Fit check between the spar.
  3. Sand the burned wood from the top edge with an emery board (outside curve).
  4. Sand the burned wood from the bottom edge (inside curve) with a piece of fine sandpaper wrapped around a round hobby knife handle.
  5. Sand the burn marks off the flat side with the emery board.
  6. Glue the front end to the front spar.
  7. Glue the back end of the previously done rib to the rear spar. (give the front glue joint time to set)

It was amazingly tempting to just cut them all out, the sand all of the ends, then sand all of the top edges, then sand all of the bottom edges, then sand all of the flats, then glue them all into place. That would have felt like it was faster.

But no matter what order I did it in, I had to repeat steps 1-7 38 times, there wasn’t any way around that. And yes, I picked up, and put down, the tools and glue bottle 38 times by doing it 1:1. But I also picked up on mistakes that I had made only once, and could check and adjust my technique as I went to ensure everything was fitting together the way it should be.

I could also more easily cut things loose when a little glue stuck the spar to the jig. It’s easier to get the knife under one stuck rib. (I only glued my fingers to the wood a couple of times, and only just a little. *smile*).

I know this is old stuff to most of my readers, but sometimes it is good to come back to the fundamentals and experience that 1:1 feels slower even though it isn’t.

One-By-One; On Demand; As Requested

Once again we see another data point on the trend.

Why is “batching more efficient?”

Simple – you haven’t solved the problems yet.

Here is an ice cream shop that has no ice cream… until you order it.

Does this shop surface the next layer of issues to solve? Certainly. But by thinking it is possible and they trying it, she is learning fast.

Flow Assembly of a 30 Story Building

Though I have some reservations (see below), this video shows a lot of good examples of flow for final assembly – only the assembly line is vertical, and the product is a 30 story hotel.

The video actually repeats twice, once with a music sound track, then a second time with no sound.

The Good

All in all, this is pretty impressive. Let’s look at the good examples that you can incorporate into your own thinking.

First, the product is designed for quick and easy assembly from the get-go. The engineers thought through how it would go together as a core part of their design process. There was no “throw it over the wall and figure it out” here.

The design itself is very modular. Detail work is done off-line in the “feeders.” This is how you want to set up an assembly line – the backbone (main line) is installation of “big chunks” that are assembled and tested in the feeders. This helps stabilize the work on the main line.

The assembly itself was flowing. Each floor progressed subsequently through the assembly stages as more stories were being added at the top. Contrast this with the more common approach of finishing the frame, then batching the various trades through.

What We Don’t Know

It is clear that this was done as a stunt. They did a good job. There are, however, legitimate questions about how, or if, the work was organized to surface and deal with quality issues. What was the line-stop process?

There are also legitimate questions in the building trade about the long-term stability of foundations and structure that does not have time to settle as it is going up. Building that go up fast can come down fast.

We truthfully don’t have enough information to make a judgment here, but I want to acknowledge those concerns as realistic whenever we see something like this.

Apparently those issues are unfounded. I admit I was repeating what I had read elsewhere. I am certainly not an expert. (See comment below)

Still, it is really cool so I wanted to share it as a good application of flow thinking.

Release the Constraints of Reality

One of the more effective facilitation tools I have come across is to have a team first construct an ideal flow, without the constraints of the space geometry, known flow-busters, or even too much concern about the takt time.

Just make things flow as smoothly and efficiently as you can envision. Develop the flow as though a single person were performing the entire process from start to finish. Make it as smooth as possible for this person. No back tracking, no awkward motions. Everything is where it needs to be, when it needs to be there.

This allows the team to let go of all of the “reasons why not” for a while, and see the possibilities.

Then, one by one, re-introduce the constraints of reality.

How can we make it work when we introduce this problem? Does the process still meet the target objective?

Approaching it this way helps teams that are so embedded in the stormy ocean of day-to-day problems that they can’t see things possibly working smoothly.

It also reinforces the notion that we want to see things, not as “what can we improve from the baseline” but rather “how far are we from the target?”

In slightly modified form, this approach worked pretty well this week. Slightly modified? I, too, sometimes have to bend things around how the world presents itself to me.

Notes From a Kaizen Event

I was cleaning out some old stuff and came across a folded piece of paper with notes on it. They were from my parting comments to a kaizen event team that had put in a great week with spectacular results. They had started out wanting to improve the delivery of WIP to and from the warehouse.

When we went to the shop floor to see the current situation, what I saw was much more opportunity. It took a little work, especially with the area manager, but by the end of the week they had gone from needing 5 work cells with 6 people each – plus more to meet the holiday seasonal production – to 4 production cells with 5 people each, that could comfortably meet the rush. Not bad for a week’s work.

That’s the background.

When I look at old notes like this, I am always comparing what I knew then with what I know now. Now and than I turn up something that gives a hint that I knew what I was doing.

These comments were as much for the rest of the audience as they were for the team members themselves. After all, they knew what they did, and were fully aware of what they had to do next. But the other teams, and their collective bosses, needed to hear it as well.

  • Wow – great team. You caught flow fever early in the week and ran with it. You make me look like I knew what I was doing – thank you.
  • You connected the operations into a smooth flow.
  • Now you can begin the process of kaizen. Stick with it, stay on the shop floor, and work to stabilize the work. Many problems will come up. Help the work teams learn how to see them and solve them.
  • If you can save, and stabilize, a quarter of a second every day, in three months you can get another 20% of productivity. Think about that – and do the math for yourself.

What made this work?

First and foremost, we had the operational manager there, fully participating. He was skeptical at first, but once I sat down with him and went through his production requirements, step by step, he began to see things in terms of takt times and production leveling rather than just quantities to push out the door. That was a big shift.

The other big thing was having  the team work off line for a few hours to construct a mock-up of a “typical” work cell. Then, without worrying a bit about the takt time, work to minimize the cycle time of one person going through the complete cycle. They learned for themselves that to save time you must study motion. We went through three or four cycles of granularity – every time they thought they had “the” solution, we introduced another tool to see the next level of extra motion. Through this exercise, they gained confidence that it was entirely possible to make a dramatic improvement in the “optimal layout” that they already had.

After that, it was a matter of getting to work. They watched the actual operators, and now could see the excess motions that were being driven by the way the work was arranged. They started making little adjustments – always being respectful of the workers. “We’d like to try something different here, just to see if it works better for you. May we just try something?”

That “May we try this?” attitude introduced something into the dynamic that doesn’t show up often enough – humility. Rather than these managers saying “We’ve got a better way, do it like this.” they were saying “We really don’t know if this will work or not,” and asking not only permission to try, but for input on whether it worked, or how it could work if it wasn’t quite there.

A lot of changes got implemented, but there was no arguing or friction because everything was just an experiment to see if it would work or not.

In the end, I saw something I had never seen before – the manager put in a budget request for a reduction, because he knew he could  get it done with less, or at least figuring out how was within his reach.

That scrap of paper reminded me of a pretty good week.

The First Steps of The Lean Journey

“Where do I start?” seems to be one of the most commonly asked, and most intensely discussed and debated, topic on the various discussion forums over the years. Yet a clear consensus hasn’t really emerged.

Normally I don’t wade into those discussions when the question is asked generically. The reason is that without specifics about the situation, it is really hard to answer. There isn’t a clear set of step-by-step directions that say “Start here” followed by (2), (3) and so on.

Here’s how I look at it.

The theoretical end-game (which you likely never reach) is perfect one-piece-flow at takt time, with a perfectly safe work environment, producing 100% defect-free product, with no environmental impact, delivering it exactly when the customer needs it, without any wasted motion.

The practical end-game comes when the laws of physics and the limits of known technology become the limiting factors for further progress. (And even in that case, this is a usually a limit of human knowledge, which can be improved.)

The beginning is where ever you are.

There is no first step.
There is only the next step that moves you incrementally and tangibly toward perfection.

That next step is going to depend largely on what you are starting with.

The variation of starting points is what confounds the efforts to set down a formula. Any abstract attempt to answer the “Where do I start?” question must build in assumptions that answer the “Start from where?” question.

Here are a couple of examples.

If there is so much clutter and junk that people have to move things out of the way just to get work done, then absolutely, begin with the classic starting point – 5S. That can take anyone a long way as they learn to question why something is out of place, and come to realize that introducing new things into the workplace can will alter the way work is done. Best to do it on-purpose than randomly.

On the other hand, if the place is fairly neat, and most of the things are where they need to be, or close, and “looking for stuff” is not a huge impediment to the work, then I might be inclined to let workplace organization naturally evolve as part of the effort to establish some degree of stability.

If there is a hugely varying customer demand signal hitting the shop floor every day, calculating takt time is an exercise in frustration. If nobody believes it is possible to stabilize the demand, they aren’t much interested in hearing about takt. So the “first steps” might be to work on a leveling system so people have some solid ground to stand on.

It comes down to what is, right now, disrupting the effort to smooth out the work.

Maybe it’s quality and tons of rework. Then we’ve got to work on that. Or part shortages. Then at least contain the problem until a long-term solution can be put into place.

Sometimes it is leader’s knowledge. They don’t believe, or don’t understand, how improvement is possible. Countermeasure? Because “knowledge” is the next impediment to improvement, the “first step” becomes some kind of leader education, study mission, or other experience that is going to give them some confidence that they can do better (and it won’t be painful to get there).

If the organization has a lot of functional silos that are disrupting each other, it could be really beneficial to take a cross-functional team through a really deep exercise to understand how their system works and why it performs as it does. (this is a good time to use the current-state value stream map or a makagami.)

How do you know?
Ah – and that is why people ask the question in the first place.
As much as I hate to say it, I think the answer is “from experience.” This is one place where it might be worth your while to bring in someone who has done this a few times and get an opinion.

But if they tell you where to start without first personally assessing where you are, I’d question the quality of the answer. “There is no substitute for direct observation,” or, to use the Japanese jargon, genchi genbutsu. You can’t answer the question without first understanding the specific situation. At least I can’t, which is probably why I stay out of those debates.

I’d like to hear what you think. Feel free to leave comments.

Don’t Lose Sight of “Why”

I just finished responding to a post on lean.org where the poster was struggling a bit to justify moving two sequential operations together vs. the proposed simple solution of adding conveyance from one to the other. I thought it would be worth a bit to think that through.

In a previous post “Sticky or Slick”, I admitted struggling a bit myself trying to capture the “lead story” of the Toyota Production System, the one sentence core principle that could guide decisions. I still think it is close to “Structuring the organization and the work environment to harness people’s creativity to save time.

Let’s apply that logic to this situation. Now obviously I have not seen this operation myself, so I have no idea about the work breakdown, the cycle times, the nature of the work elements, so I am going to make up opportunities that illustrate the point.

I believe the key point that gets lost here is that, in 99% of the cases, you are not moving operations closer together. You are moving operators together. You are improving material flow with the purpose of creating better people flow. The TPS is about people. Specifically, it is about organizing the work and the work place so the people can make improvements that save time and make a difference.

If two operations operators team members who are performing sequential operations are separated in space or time, then although each can work to improve her own individual work, the results don’t pass the “so what?” test. “I reduced my work cycle from 10 minutes to 7 minutes.” So what? Now you are idle for 3 minutes. You still need to be there. And it is usually beyond the technical wherewithal of a shop floor team member to automate himself completely out of a job. Since they cannot reduce cycle time to zero, there is no net difference.

But now you have a problem to solve:
This person is idle (the waste of waiting). What must I do so he has meaningfully work?

Changing the layout is now the obvious countermeasure.

To turn this “problem” into true kaizen, create or improve flow by placing those two operations very close together. Now the magic happens. As each team member works to save time (or as they work as a team), they can also continually re-balance their work so at least one of the two is still loaded close to the takt time. Eventually they reach the point where one of them can perform both operations, freeing up the other. Even if this does not quite happen, by always consolidating the wait time onto one person, that person can take on more tasks assuming they are within reach. If they are not within reach, then move them closer together and facilitate more kaizen. Changing the layout is a countermeasure, not the objective. It is a countermeasure to the problem – the waste of waiting.

The “why” of putting things close together is to give the workers the power to improve their own work and the total flow of the system. The side-benefit of doing this is that you reduce inventory and save time. People’s time, throughput time.

Structure the work and the work place so the people who do the work have the opportunity to improve the system in a meaningful way.

The cycle of kaizen:

  • Attack overproduction so other wastes are revealed.
  • Convert other forms of waste to the “waste of waiting.”
  • Adjust the work balance, and then the physical flow to eliminate the waste of waiting.

If you do it in the other order – attack the waste of waiting first, the only way a team member can remain busy is through overproduction… and overproduction is bad. Very bad.

and.. after a couple of months and several dozen posts I finally added the category “kaizen” for this one. I am not sure why it took so long.